Sep 14, 2014

Final symphony concert

I went to another games music concert two days ago titled Final Symphony - Music from Final Fantasy VI, VII and X. And boy did I love it! Final Symphony is a series of concerts played in different countries by different orchestras but with the same conductor. These kinda events are not held very often especially here in Finland so it was wonderful to see this one become true. And it didn't matter at all that I had to travel back home from Tampere by train at midnight..


It was such an awesome experience because I'm a huge fan of Final Fantasy series. After all one of my first games ever was Final Fantasy VIII. I've played through all the FF games from 1 up to 12 with my good old PS1 and PS2 and love every single one of them. What makes the games so great for me is not the storyline or drama, heck I couldn't even read in English when I was a kid. It was always about making progress in the games and experiencing new locations, fighting monsters and leveling up the characters. All accompanied with great music and great visuals.


If I compare it to the Finnish games music concert held last month, this one beat it on an emotional level by a mile! Until next time.

Aug 22, 2014

3D printing yet again

So I received my last and latest order for this summer from Shapeways some time ago.
I had ordered a keychain and a pendant of sorts out of stainless steel. Both top-notch quality and perfect for my intentions.
Compared to the badge I made earlier these ones have a circular extrusion that allows them to be attached to a keyring for example. The pendant is like the usual ambigram logo design but wrapped around a circle twice. Looks pretty "twisted" and cool to me, hah.


I went to the same craft supply store as before and bought some brown mocha leather necklace string for the pendant. I also bought a small piece of jewellery that is often attached between the cord and the pendant. Here's a peek at the process from the unattached parts to the final piece shot against a white backdrop:

My own necklace waiting to be assembled
This is how it turned out
Looks pretty decent, don't you think?
My venture into the world of 3D printing has been a very exciting personal project to work on. Now I just need to come up with some new ideas to make.

I've also been working on my showreel or a video collection of recent works and animations. I've only included stuff from the past year, nothing older than that. It's going to be about a minute long and a sort of like a personal introduction video about me and my 3D skills. I'm trying to get it online in the coming weeks but we'll see..

On a side note but still absolutely relevant to mention: I went to a concert at the Helsinki Music Centre titled "Pelin henki - Pelimusiikkia orkesterille" today evening.

Today's concert ticket (notice the book and the Death Star)
The concert was a montage of fully orchestrated versions of the tunes and main themes from popular Finnish video games: Angry Birds, Tiny Thief, Clash of Clans and Alan Wake.
Even some of the original composers were present at the event and people seemed to genuinely like the music.
A pretty cool event and I liked it a lot.


I'm trying to get back into character animation later this year and obviously make some general progress as a 3D artist.
My second year at Aalto Arts is starting next month so it's going to be busy times ahead.

Jul 15, 2014

Entire month of SWSCA

I decided to subscribe for a full month at Stan Winston School of Character Arts. It's an online educational site that has a wide collection of movie makeup, VFX and practical effects education. Pretty damn interesting to say the least!

Stan Winston was one of the special effects gurus of the American film industry who was responsible for many of the iconic movie characters we know today. The workshop founded by him has made creations for films such as Predator, The Terminator, Aliens, Jurassic Park, Avatar etc.
I'm a huge fan of majority of their work, and you can even spot my Predator figure standing on my desk.

I already activated the courses on digital storyboarding and prosthetic makeup effects.
So far things have been worth every penny.

The storyboarding course for example taught how to use Maya in the creative process of planning camera angles, finding the right perspective lines for the drawings etc. Playing around with the exact focal lengths and everything inside a 3D program makes it easier to test different compositions and provides physically accurate results.
I already have knowledge of Maya so it was pretty easy to keep up with the tutorial.

Then I watched how pros make their masks out of pro materials. Apparently there's a tool for everything..
I have made latex masks myself and am a huge fan of cool masks and costumes so this was kind of a fan moment for me.

Here's a couple of pictures from my sessions taking notes and everything..


Oh, and here are the links to the actual courses.


Obviously the full courses are only available for paid subscribers, but they offer free previews for everyone.


All in all, I recommend SWSCA for everyone interested in visual and special effects!

Jun 26, 2014

The Ambigram printed in 3D

I received yet another order from Shapeways! This time I had decided to prepare two different 3D printable versions of my own signature logo of sorts: the Ambigram.
The actual symbol is a design that I made for myself already back in 2009. It's a stylized version of my first name with lots of sharp edges. The catch with these so-called ambigrams is that they look exactly the same when viewed from a different angle i.e. rotated upside down..


I also wanted to try out two different materials: the smaller one is made out of stainless steel and the other out of polished white plastic. I have to say that especially the metal one looks very cool!


Here's the page of the final product:

I have to note that it was not just a simple extrusion but a truly three-dimensional piece. The actual letters stick out a bit and they are slightly bevelled. I used Blender 3D for all the modeling work as usual. The objects had to be all made watertight and then scaled into appropriate versions. Once again it took me a few tries to make the models pass all the printing requirements..


I had already decided to use the steel one as badge so I went to a local craft supply store earlier today and bought a couple of these pieces that are attached into every badge:


Then I added a thin layer of black fabric to hide them.
Here's how the thing turned out:


Finally, I attached the badge to my leather bag. Looking good if I might say so!


On a final note, I wanted to see how easy it is to paint plastic prints with acrylic paints.
Turns out the paint sticks very well with no issues. After a few layers of paint white print turned out like this:


My plan is to start sculpting action figures or tiny busts/portraits someday and then possibly paint them by hand.
It seems that 3D printing is the way to go if I want to make multiple cost-efficient copies.
Now how about that!

Jun 24, 2014

Progress report - June

Here it is: the very first glimpse on my "secret" summer project.
It's just that I don't usually like to reveal too much about work that is incomplete.
However, I'm confident with this one.

Ok, so it's a music video.. but also a more cinematic story inspired by graphic novels, game cutscenes and such!
And yes, it's going to be all CG made with Blender.
But let's face it: almost 4 minutes in total this animation project is going to be nearly an entire half of a ten minute short film!
It's insane amount of work but I really want to see how far I'm able to push my skills: not working only on a still image or one shot but multiple scenes instead!

So far I've finished working on six individual shots or sequences of the story.
I've had to model all the assets and props, craft simple environments and animate the scene to be able to render final composite images.
There's also simulations to deal with such as leaves in the opening sequence and smoke in various scenes. Lots of things that require some further tweaking.
And I still have more environmental modeling left to do for the rest of the shots.

Here's some of the completed final frames in HD resolution.
Some of them may eventually change a bit...

The cover art design from my previous post!


Closeup of the wheels in motion


Wide view of the desolate landscape


This one seems spooky enough


Highway to Hell... sort of


One of the more climatic shots


And a behind the scenes screenshot of the mess I'm dealing with, ugh.


Wait for more to come!

Jun 12, 2014

Imaginary cover art for The Riff

Inspired by the visual style of graphic novels I decided to create a new non-photorealistic 3D illustration using Blender. This is also going to be featured in my summer project that I'm currently working on if all goes well. Here's the final result:


This imaginary cover art illustration is based on the lyrics of a heavy rock song called The Riff by my favorite band Lordi. I try not to do too much fanart nowadays but I felt that the lyrics alone gave me enough freedom to use my own ideas! The lyrics tell a vague story about a man that gets picked up by Mr. Death himself driving an old Chevy. The grim reaper takes the narrator on a dreamlike road trip that ends up in a car crash: The reaper bites the dust but the man survives.

To start off I've been modeling the Chevrolet Impala 1959 convertible car model from scratch for quite some time. It's one of those things that every 3D modeler has to go through at least once in their time. Not to mention the fact that Industrial Designers are usually car freaks.. even though I'm not that much. Creating the car replica was a project on its own that I've been working on and off in my spare time. Every detail is modeled by hand based on various reference photos that I found online.

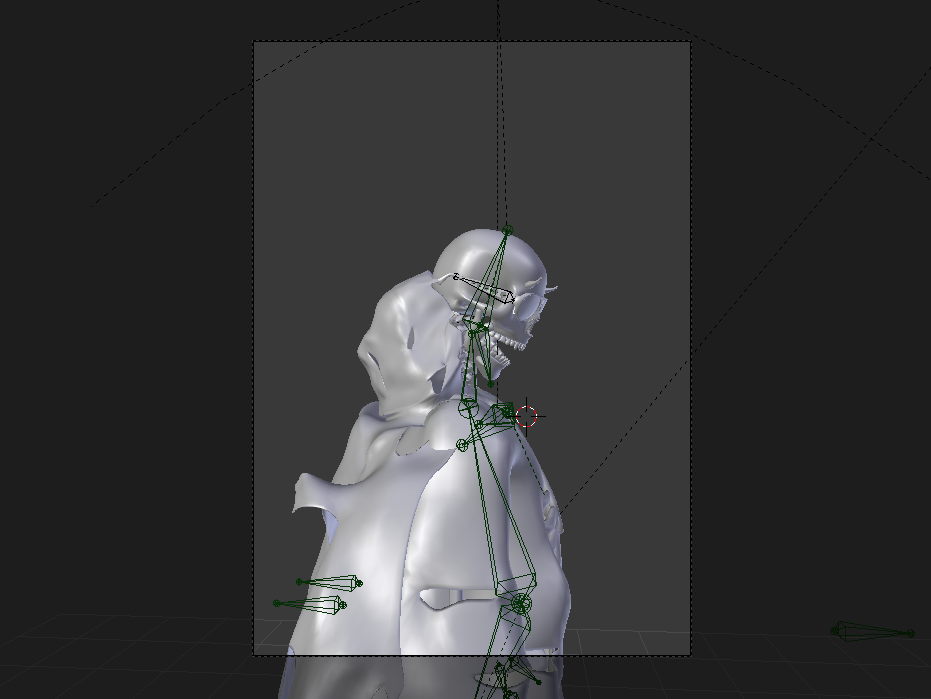
I used MakeHuman to create a generic male character that fits the role of the narrator. However I had to tweak the weighting of the rig to make it work correctly inside Blender. The grim reaper was made using an existing skeleton 3D model from blendswap.com that I then customised further: I modeled the horns, the ragged robe and attached a pair of sunglasses that I had already created by myself.

To create the two-toned look of the rendered images I used a non-photorealistic shader. All that I have in the scenes is one sun lamp that provides even illumination from one uniform direction. The final shade of the surfaces is based on the illumination and is either black or white.

Here's a couple of viewport views inside Blender:


The final image compositing was quite tough to pull off and it involved lots of experimenting back and forth between Blender and Gimp that I use for image editing:

Foreground elements with no visible contact shadows

Shadow pass I used to create the inverted shadows

Rendered grim reaper element
In the final cover art image I added a black bar behind the grim reaper to fit the text inside. It was the same license plate font from dafont.com that I used in the car's plate. Overall this illustration was insanely fun to create and it shows that not every render has to be photorealistically created to have a strong impact.

May 30, 2014

3D printed figure

Whew, not only a day has passed since my last post but damn: I received today my first ever 3D printed figure!!
The design is all made by me from scratch. The harness boots, tall and skinny proportions, wavy hair, black clothing and blue eyes are all based on my own characteristics. I also applied some general principles about facial caricature to capture some vague likeness.

95 mm height in total with a 48 mm bottom radius
It was such a long process to transform the initial idea I had into an actual figure. All the modeling, texturing, assigning weights and rigging the character had to be done in order to be able to make this poseable character. I created the model using open source Blender 3D some time ago, but there was still a whole lot to do to get it prepared for printing. The model had to be watertight and the textures all in one map which was not an easy task.

Screenshot of the 3D model and the final product render

After everything was done I sent it to Shapeways for printing. It's a company that manufactures properly created 3D models into physical items. I chose a material called Full Color Sandstone that is currently the only option that supports fully textured print. It took less than two weeks to arrive and now it's finally here! I have to say that it's such a cool tiny little fellow and I like it a lot.

3D printed figure photographed

I've always collected action figures and appreciated cool character designs. What could be more exciting than making one actually yourself without any limitations. And hey, this is what we Industrial Design students do in our spare time: make products that could be mass marketed to wide audiences. In all seriousness to be able to control every aspect of the final piece with such fine details is amazing. This is truly the beginning of something cool and awesome.